Help with setting up sheetcam rotary plasma and mach3 I managed to set up for round tube but for square tube the torch works by air
Maybe there is a step-by-step instruction how to set up
Because I have on post rotary plasma Mach 3 gives errors Mach 3 itself.
Hello, can you tell more about what problems you are encountering? I just setup sheetcam rotary plasma with Mach3 and got it working fine.
Do you have a probe on your Z axis? To my understanding the default rotary plasma post does a probe:
G28.1 Z53.00 F500.0 ← Z is lowered until probe input activates at feedrate of 500, maximum probe movement is 53mm
G92 Z48.5000 ← When the work surface is probed, In my case when cutting 100x100 RHS this line sets current Z to 48.5, but does not move the torch. The sheetcam rotary plasma calculates the Z distance moves from the center point of the RHS tube.
It is not exactly half of the tube aka Z50 because of this line in the PlasmaRotary Mach3 post:
–Put your switch offset value here in MILLIMETRES
switchOffset = 1.5
So if you have a floating torch head as a probe (the torch raises a bit when probing until it hits a limit switch) you would put the distance the torch raises until the limit switch activates when probing as the switchOffset. And this is why the G92 Z is not 50, but 48.5.
So basically you probe the tube to get the RHS work surface. But the Z coordinate is then offset with the G92 code. When cutting sheet metal when you probe the Z would just be 0. (without any G92 offsets)
Thank you for the reply, Jjonnela.
Yes, I do have a metal-detecting sensor on the floating head.
G28.1 Z53.00 F500.0 ← Z is lowered until the probe input activates at a feedrate of 500.
With this command, my machine moved up to the Z-axis home switch first, then went down and searched for metal.
I realized that I was going in the wrong direction with the setup.
Could you send me how this section is configured in your post-processor, the part where those settings are located?
In Mach3, did you modify the M3 and M5 macros, or did you leave them as default?
How do you configure the rotary axis in Mach3 so that it travels 360 mm per one full rotation?
Is it supposed to work like that?
Which controller board are you using with Mach3?
Try changing this near the top of the post processor:
”–If this value is set to true then use G28 (home) for the Z reference
–Set it to false for G31 probe
refHome = true”
So set refHome = false and then the post will produce a basic Mach3 G31 probe command.
I didn’t modify M3 or M5 macros. I’m using CSMIO IP-S motion controller.
You need to figure out the correct steps per unit on your rotary axis so 360mm = one full rotation.
If it’s hard to calculate, you can try using this “Set steps per unit” functionality on top of the reset button in Mach3 settings tab:
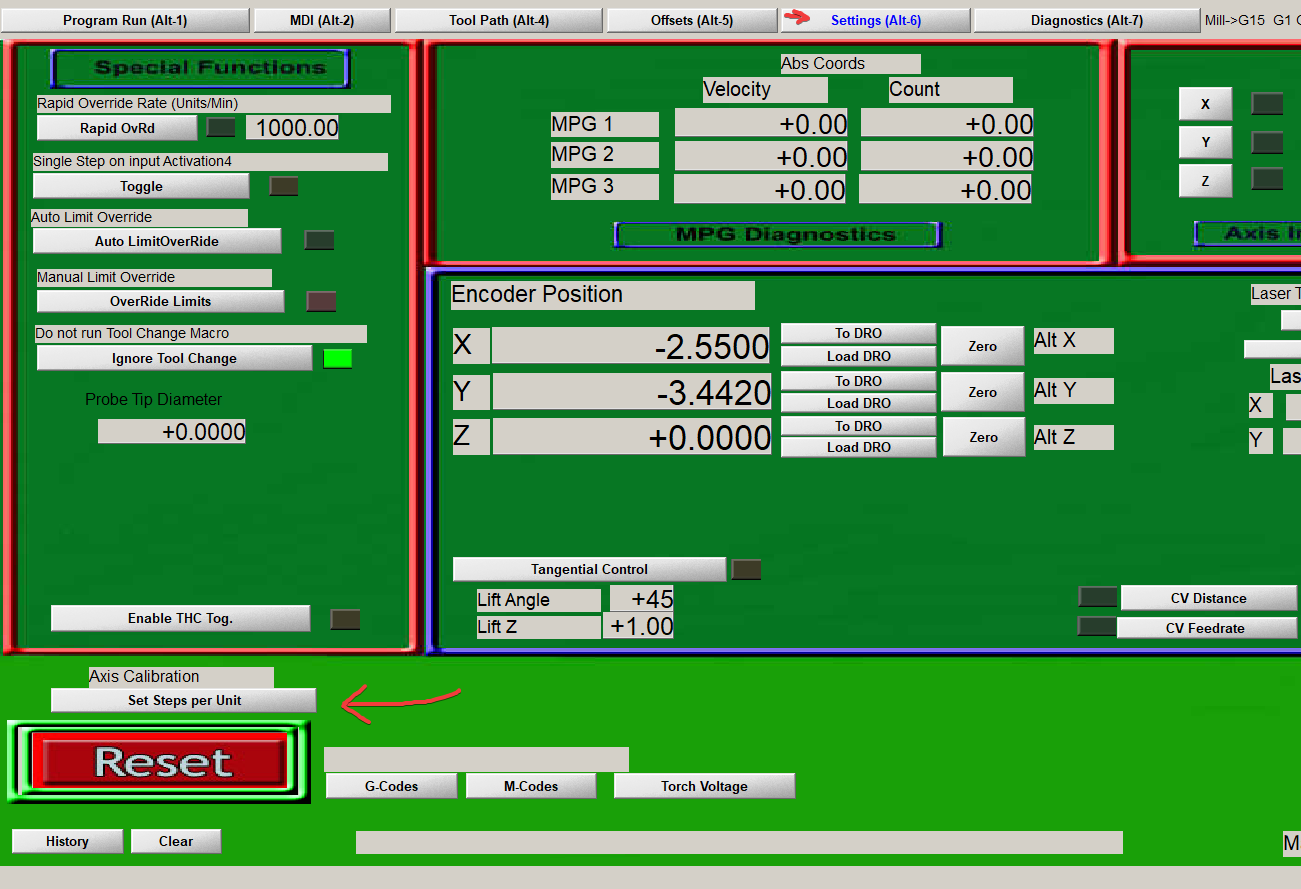
With that you can “calibrate” your steps per unit.
It works like this:
First you input the amount of movement you want on your rotary axis, for example 360mm.
Then Mach3 moves it 360mm (or what it thinks 360mm is)
You need to measure how much the rotary axis actually moved and input that measurement on the next dialog, then Mach3 will calculate the correct steps per unit.
You may need to do it a couple of times, first to just get “close enough” and then do more accurate measurement.
I figured out how G28 works. I thought the metal-detecting probe worked through the probe parameter in Mach3, but it turns out that in Z RefHome I had set the homing direction the wrong way in Home/Limits. I changed the direction and everything started working. Thank you.
Based on your information, I configured the rotary axis correctly. Thanks.
Did you cut 40×40 mm square tubing?
I currently have a problem cutting this kind of tube — when rotating to the second corner, the tube seems to shift and the torch hits it, but this looks like a mechanical issue with my machine.
Are you using a THC?
I want to understand whether it will improve cut quality or make it worse.
Can you explain what these two parameters in the post-processor are for?
(Rapids will move the shortest distance to the next cut but may cause machines with limited rotation to ‘wind up’. Set this to 0 to disable optimization. — defaults to 1 if not defined
optimiseRapids = 1
maxRotation = 6)
Did you set correct tube radius on SheetCam? Did you change the probe offset in the post processor to suit your probing? Is your tube straight and also mounted straight on your rotary axis?
If not, of course some corners will be different distance from torch. And if you have too high acceleration or speed and maybe lose steps that will also cause rotation and Z to be not synced.
I don’t have THC on my pipe cutter for now at least, its completely different machine than my sheet cutting plasma table. I think if everything is square and straight THC shouldnt be needed..
I haven’t had time to use the rotary plasma a lot yet so maybe I will run to same problems as you.
I’m not sure about the parameters but this is what I assume it means:
Do you want to always move between 0-360 degrees or do you want to go above a full rotation. For example if you are currently at 360° and the next cut would be at 20°, do you want the machine to go backwards 340 degrees or 20 degrees forward to another rotation.
So if your rotary axis has some cables around it or it mechanically can’t go over one full rotation it should always stay between 0-360° and not go over 360° to prevent wind up. And “maxRotation = 2” would make it so the axis would work between 0-720°..
This is what I think but I’m not sure, I’m new to SheetCam and this whole rotary plasma thing ![]()